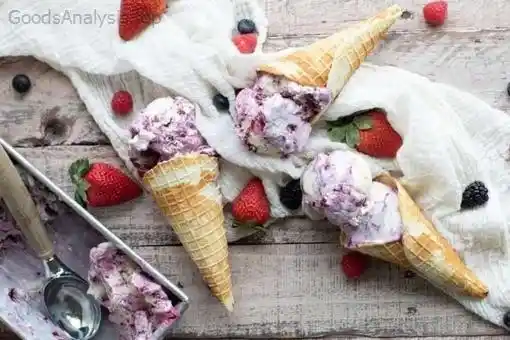
Ah, ice cream! The sweet, creamy indulgence that has been an irresistible treat for generations. Whether enjoyed on a hot summer day or as a comforting dessert after a hearty meal, ice cream remains one of the world’s most beloved foods. And the best part? Making it yourself isn’t just a possibility, it’s also a fun and rewarding experience.
But before we dive into the “how-to” of homemade ice cream, let’s consider a few important things to ensure that when you do make your own, it’s the best batch you’ve ever had. So, grab your favorite spoon, and let’s start!
The Basics of Ice Cream: What’s Inside?
At its core, ice cream is made from just a handful of ingredients, but the magic happens in the process. Typically, the key ingredients include:
- Milk and cream: These form the base of your ice cream. The more fat, the creamier the texture. Full-fat cream will give you that rich, indulgent flavor you crave.
- Sugar: Sweetens the mix. It also plays a role in lowering the freezing point of the ice cream so it doesn’t become a solid block of frozen milk!
- Egg yolks (for custard-style): Some recipes call for egg yolks, especially in the French-style ice cream, which adds a luxurious texture and deeper flavor.
- Flavorings: Vanilla, chocolate, fruit, or even coffee — you can customize your ice cream however you like! These give the ice cream its distinctive taste.
- Stabilizers: While not always necessary, stabilizers like guar gum or gelatin can help prevent ice crystals from forming, resulting in a smoother texture.
Making Ice Cream Without an Ice Cream Machine
One of the most common myths about making ice cream at home is that you absolutely need an expensive ice cream maker. Not true! With the right technique, you can make delicious ice cream by hand, using just a few simple tools. Here’s a quick guide on how to do it:
1. Prepare the Base
In a saucepan, combine your milk, cream, and sugar. Heat gently while stirring to dissolve the sugar. If you’re making a custard base, whisk in the egg yolks and cook the mixture until it thickens slightly. You can flavor the base by adding vanilla extract, cocoa powder, or fruit purees during this stage.
2. Cool the Mixture
Once the base is ready, remove it from the heat and let it cool to room temperature. To speed up the process, you can place it in an ice bath (just make sure no water gets in!). You’ll want to chill the mixture in the fridge for at least 4 hours, or overnight for best results.
3. Freeze and Stir
Now comes the fun part. Pour the cooled mixture into a shallow pan or dish and place it in your freezer. Every 30 minutes, stir the mixture vigorously with a fork or whisk. This helps break up ice crystals as they form, giving your ice cream that soft, creamy texture. Repeat this for about 3-4 hours, or until your ice cream reaches the consistency of soft serve.
4. Enjoy!
Once your ice cream is ready, it’s time to scoop and indulge! If you’ve made a classic vanilla base, you can add mix-ins like chocolate chips, cookie crumbs, or fresh fruit to create your custom ice cream.
Making Ice Cream with an Ice Cream Maker
While making ice cream by hand is totally feasible, using an ice cream maker can simplify the process and give you an even smoother result. Here’s a quick rundown of the steps if you’re using one:
- Chill the Ice Cream Bowl: Most ice cream makers require the bowl to be frozen for at least 12 hours before use. Make sure you prepare ahead of time.
- Prepare the Base: As with the no-machine method, heat your ingredients together, then cool them in the fridge for a few hours.
- Churn: Once the base is chilled, pour it into the ice cream maker and churn according to the manufacturer’s instructions. This usually takes about 20-30 minutes.
- Freeze: After churning, the ice cream will be soft. Transfer it to a container and freeze for another 4 hours to firm it up.
Common Mistakes and How to Avoid Them
Even though making ice cream sounds simple, there are a few pitfalls you should watch out for:
- Over-churning: While churning is essential to get the creamy texture, over-churning can lead to a buttery texture that isn’t ideal. Keep an eye on the consistency, and stop when it reaches soft-serve stage.
- Ice Crystals: If you don’t stir the ice cream often enough, you might end up with large ice crystals, which will affect the smooth texture. If you don’t have an ice cream machine, don’t skip the stirring process!
- Too much sugar: It’s tempting to load up on sugar, but this can alter the texture and freezing point of your ice cream. Stick to the recommended amount unless you’re experimenting with new flavors or ingredients.
- Not chilling the mixture properly: If the mixture is too warm when you start freezing it, it can lead to an icy texture. Patience is key – don’t skip the chilling step!
Troubleshooting: What To Do When Things Go Wrong
Sometimes, even the most seasoned ice cream maker runs into problems. Here’s how to troubleshoot common issues:
- Ice cream is too hard: If your ice cream is too firm after freezing, it’s likely because it wasn’t churned long enough or wasn’t stirred enough. Just leave it at room temperature for 5-10 minutes before scooping.
- Ice cream is too soft: If it won’t firm up even after hours in the freezer, you might have over-churned it or used too much sugar. Adding stabilizers or reducing sugar can help prevent this in the future.
- It tastes bland: If your ice cream is flavorless, you might not have added enough flavorings. Try increasing the vanilla, cocoa powder, or fruit puree. And remember, a little pinch of salt can help balance sweetness.
The Healthier Side of Homemade Ice Cream
If you’re concerned about the sugar and fat content of traditional ice cream, homemade versions offer a way to make healthier choices. Here are a few tips:
- Use natural sweeteners: Swap refined sugar for honey, maple syrup, or agave nectar.
- Use alternative milks: Coconut milk, almond milk, or oat milk can create delicious dairy-free ice creams.
- Cut back on cream: Use more milk and less cream to reduce fat content. However, this may affect the richness and creaminess of your ice cream.
- Add fresh fruit: Instead of store-bought toppings, load up your ice cream with fresh berries, peaches, or even a swirl of homemade fruit puree.
Final Thoughts
Homemade ice cream is a treat that can be as simple or as complex as you like. Whether you’re an ice cream aficionado or a first-timer, there’s a sense of satisfaction that comes from making it yourself. The key is to experiment, have fun with flavors, and enjoy the process.
Just remember: if you can’t make it perfect the first time (or even the fifth time), don’t give up! The best ice cream makers are always learning, adjusting, and refining their methods. And hey, that’s all part of the fun.
Opinions from Around the World
John, 35, USA: “I love making ice cream with my kids! It’s a great way to spend time together, and they love choosing the flavors. I’ve never used an ice cream maker, so we always do it by hand. It takes some time, but it’s totally worth it.”
Maria, 52, Spain: “For me, ice cream is a tradition. I’ve been making it the same way for years, and I always use natural fruits. It’s the best way to ensure the flavor is fresh and pure. And yes, I do use an ice cream maker now — it makes life easier!”
Ravi, 28, India: “I’ve recently started making vegan ice cream at home. Using coconut milk and a bit of jaggery gives it a wonderful taste. I think homemade ice cream is not just a treat, but a way to experiment with different textures and flavors.”
Keiko, 62, Japan: “When I was young, ice cream was a rare luxury. Now, I make my own with simple ingredients. I love adding matcha powder for that authentic Japanese flavor. It’s delicious and healthier than store-bought options!”
Anna, 19, Russia: “Honestly, making ice cream at home feels like an art form. I use berries and honey for sweetness. The texture is always so smooth compared to store-bought stuff, and I like that I know exactly what’s in it.”
Ready to Make Ice Cream?
Now that you have the complete guide, the next step is clear: get in the kitchen, gather your ingredients, and start experimenting. The perfect batch of homemade ice cream is waiting for you — and remember, it’s all about having fun while making it!

