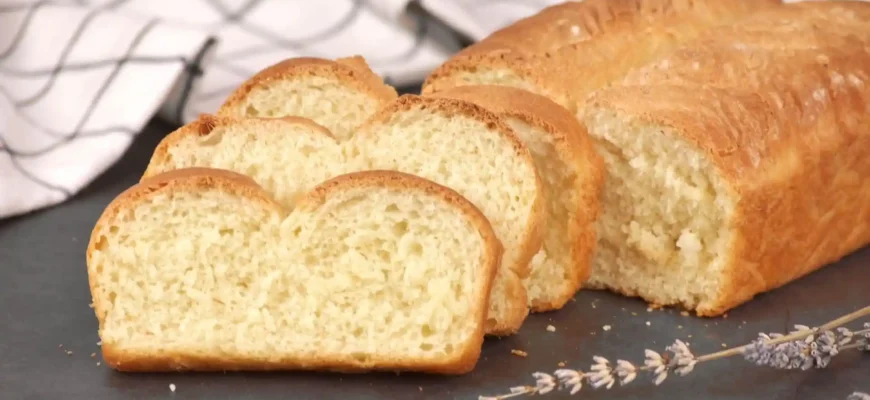
Bread, the oldest and most universally loved food in the world, has been around for thousands of years, and making it yourself is one of the most satisfying and rewarding things you can do in the kitchen. Whether you’re a seasoned baker or a complete beginner, this guide will walk you through the process of making bread, while also sharing expert tips, common mistakes to avoid, and everything in between. Plus, I’ll sprinkle in some fun insights, because let’s face it—baking bread is one of those activities where even the mistakes can lead to something delicious!
Why Bake Bread at Home?
Baking your own bread has multiple advantages. The first, of course, is the taste. There’s nothing like the smell of freshly baked bread wafting through your house. Secondly, homemade bread is free from the preservatives and artificial additives often found in store-bought varieties. Plus, when you bake your own bread, you can control every ingredient—be it choosing organic flour, switching to whole wheat, or experimenting with different types of grains like rye or spelt.
But let’s be honest: the real appeal is how satisfying it feels to pull a golden loaf from the oven. It’s not just about feeding yourself; it’s about creating something tangible from scratch.
Ingredients You’ll Need
To make a basic loaf of bread, you only need a few simple ingredients. Here’s the standard list for a classic white bread loaf:
- Flour: You’ll need strong bread flour, which has a higher protein content than all-purpose flour. If you want to go whole grain, you can use whole wheat flour or a combination of the two.
- Water: Warm (not hot) water is essential for activating the yeast. Too hot, and you’ll kill the yeast; too cold, and it won’t activate properly.
- Yeast: Active dry yeast is the most common, but you could also use instant yeast or even sourdough starter if you’re feeling adventurous.
- Salt: Salt gives flavor to your bread and controls the yeast fermentation. Too much salt can inhibit yeast growth, so stick to the recommended amount.
- Sugar: A small amount of sugar helps feed the yeast and promotes rising. You can also use honey or maple syrup for a natural twist.
- Oil or Butter: This adds moisture and richness to the dough, making the bread softer and more flavorful.
The Basic Bread-Making Process
Now that you’ve got your ingredients, let’s get started on the bread-making process. Don’t worry if this seems intimidating at first; it’s easier than it looks. Let’s break it down step by step:
- Activate the Yeast
If you’re using active dry yeast (not instant yeast), dissolve the yeast and sugar in warm water (about 100°F / 38°C). Let it sit for 5-10 minutes until it’s foamy. If it doesn’t foam, your yeast may be expired, or the water might have been too hot or too cold—both common mistakes! - Mix the Dough
In a large bowl, combine the flour and salt. Make a well in the center and pour in the activated yeast mixture. Add your oil or butter. Stir until the dough starts coming together, then knead it by hand on a floured surface for about 8-10 minutes. The goal is to work the dough until it’s smooth, elastic, and slightly tacky, but not sticky. - First Rise
Place your kneaded dough in a lightly greased bowl, cover it with a damp towel or plastic wrap, and let it rise for 1-2 hours at room temperature, or until it doubles in size. Be patient—this is where the magic happens! - Shape the Dough
Punch down the dough to release any air bubbles, then shape it into a loaf. If you’re using a loaf pan, grease it lightly before placing the dough inside. If you prefer a rustic round shape, simply place it on a parchment-lined baking sheet. - Second Rise
Cover the shaped dough and let it rise for another 30 minutes to an hour. This will give it that nice, airy texture. While it rises, preheat your oven to 375°F (190°C). - Bake the Bread
Place your dough in the oven and bake for 25-30 minutes. You’ll know the bread is done when it sounds hollow when tapped on the bottom. If you have a thermometer, the internal temperature should reach about 190°F (88°C). - Cool and Enjoy
Let your bread cool on a wire rack. I know it’s tempting, but try not to slice it while it’s still hot—this can affect the texture. Let it cool for at least 30 minutes before cutting into it. Enjoy your homemade bread with butter, jam, or any spread you fancy.
Common Mistakes and How to Avoid Them
Now, before you start worrying about messing up, let me tell you—baking bread is a forgiving process. But there are a few common pitfalls to watch out for:
- Not Measuring Ingredients Correctly
Baking is a science. Flour can settle or pack into a cup, so always use the spoon-and-level method when measuring flour. A digital scale is the most accurate option if you’re serious about precision. - Overworking or Underworking the Dough
Kneading is important for developing gluten, which gives bread its structure. Too little kneading means your dough won’t rise well, and too much can make the bread tough. Aim for a smooth, elastic dough. - Not Giving Enough Rise Time
Rushing the rise will result in a dense loaf. If you’re short on time, you can try a quick-rise bread recipe or place your dough in a warm spot, like an oven with the light on. - Baking at the Wrong Temperature
Ovens vary, so your bread might need more or less time than what’s stated in a recipe. Use your senses: look for a golden-brown color, and tap the bottom of the loaf to hear that hollow sound. - Ignoring the Cooling Time
The cooling period is crucial. If you slice your bread too soon, you may end up with a gummy texture. Patience, my friend, patience.
Variations: Get Creative with Your Bread
Once you master the basic loaf, you can start experimenting with flavors, shapes, and types of bread:
- Whole Wheat Bread: Swap out some or all of the white flour for whole wheat flour.
- Sourdough: If you’re feeling adventurous, try making sourdough from scratch! It’s a longer process because it involves cultivating your own wild yeast, but it’s totally worth it.
- Herb and Cheese Bread: Add herbs like rosemary or thyme to the dough, or mix in cheese for a savory twist.
- Sweet Breads: Cinnamon rolls, challah, and brioche are all sweet varieties that you can make at home with a little extra sugar and butter.
Why Some People Might Avoid Baking Bread
While baking bread is a wonderful and enjoyable activity, it’s not always for everyone. For some, the time and effort involved might seem like too much. Others may have dietary restrictions that make homemade bread less appealing, such as gluten intolerance or allergies to certain ingredients like wheat, dairy, or eggs. But fear not—there are plenty of gluten-free and vegan bread recipes out there to accommodate a variety of dietary needs.
What People Say About Baking Bread
John, 58, USA: “I’ve been baking bread for years, and I can tell you—it’s one of the best things you can do for yourself. It’s not just about the bread; it’s about slowing down and enjoying the process. I’ve tried dozens of recipes, and honestly, it doesn’t get old.”
Maria, 35, Spain: “I first tried baking bread during the pandemic, and now I can’t stop. I love making my own sourdough. It’s so much healthier and tastier than store-bought, and you get this amazing sense of pride when you pull it out of the oven.”
Chen, 42, China: “Bread wasn’t a big part of my diet growing up, but since moving to a Western country, I’ve been more interested in learning how to make it myself. It’s surprisingly easy, and the best part is that I can make it to my exact taste.”
Amira, 29, Egypt: “As a busy mom, I don’t always have time for bread-making, but when I do, I make a double batch! It’s cheaper and so much better than the stuff in the supermarket.”
Final Thoughts
Making bread is as much about the journey as it is the destination. Yes, you’ll make mistakes (trust me, I’ve made plenty), but with practice, you’ll find that it’s one of the most rewarding things you can do in the kitchen. Whether you’re baking for yourself, your family, or to impress your friends, there’s nothing quite like the feeling of serving up a freshly baked loaf of bread.
So, get out there, roll up your sleeves, and get baking—your taste buds will thank you!

