
The Bridge Pose, or Setu Bandhasana, is one of those yoga poses that looks deceptively simple but offers a wide range of benefits. Whether you’re a seasoned yogi or someone just starting out, this pose can help strengthen your core, improve your posture, and even support spinal health. But, like anything in life, it’s not without its nuances. Let’s take a deep dive into how to do the Bridge Pose properly, what it can do for you, and some things to watch out for.
What is Bridge Pose (Setu Bandhasana)?
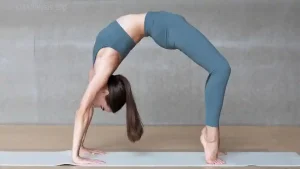
Bridge Pose is a backbend that requires you to lie on your back and lift your hips towards the sky while keeping your shoulders and feet grounded. It’s often used as a counterpose to forward folds and as part of a flow sequence in yoga. The pose targets several areas of the body, including the spine, glutes, hips, and thighs, while also stimulating the chest and lungs.
Step-by-Step Instructions: How to Do the Bridge Pose
- Start on Your Back
Lie flat on your back with your knees bent and feet placed flat on the mat. Your feet should be hip-width apart, and your heels should be as close to your sit bones as possible. Keep your arms at your sides, palms facing down. - Engage Your Core
Gently draw your navel towards your spine to activate your core. This is crucial for protecting your lower back during the lift. - Lift Your Hips
Press your feet firmly into the mat, and slowly lift your hips toward the ceiling. As you do this, focus on squeezing your glutes and inner thighs to help elevate your pelvis. - Align Your Spine
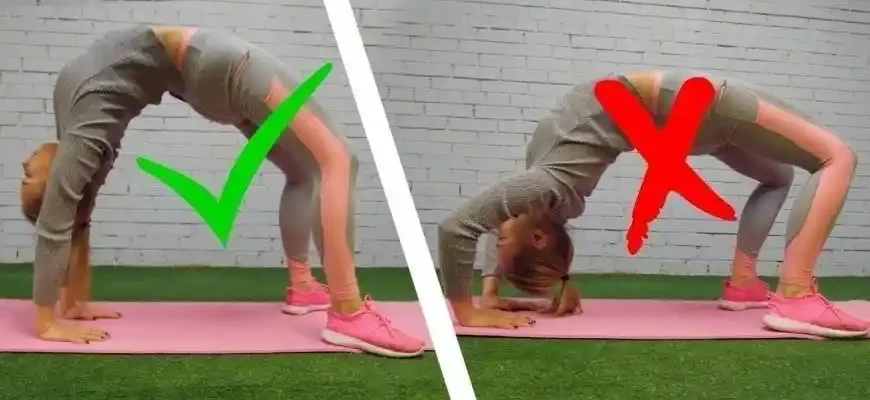
Once your hips are lifted, ensure your body forms a straight line from your knees to your shoulders. Don’t let your knees splay out to the sides or collapse inward. Keep them in line with your hips and ankles. - Check Your Neck and Shoulders
While in the pose, keep your neck long and relaxed. Avoid turning your head to the sides, as this can strain your neck. Also, ensure your shoulders remain grounded, not lifted towards your ears. - Engage Your Thighs and Glutes
Keep engaging your thighs and glutes to avoid collapsing in your lower back. Imagine drawing your thighs toward one another to keep the energy in your legs active. - Hold the Pose
You can stay in the pose anywhere from 20 seconds to a few minutes, depending on your level of practice. Breathe deeply and steadily throughout. - Release the Pose
To release, gently lower your spine back to the mat, starting with your upper back and then your lower back. Relax your body completely before moving into your next position.
Benefits of Bridge Pose
Now, why should you bother with the Bridge Pose? Here are some key reasons why it’s a fantastic addition to any routine:
- Spinal Health
This pose helps lengthen and stretch the spine, which can improve flexibility and reduce tension. It’s often recommended for people who spend long hours sitting, as it counteracts the effects of a sedentary lifestyle. - Strengthens Core and Glutes
As you lift your hips, you activate your glutes and core muscles. Over time, this can lead to increased strength in the lower back, pelvis, and abdominal area, which supports better posture and balance. - Opens the Chest and Shoulders
Bridge Pose is a gentle chest opener, which is great for those who spend too much time hunched over computers or phones. It can also help expand the lungs and improve breathing. - Improves Circulation
By elevating your hips above your heart, this pose can help increase circulation, which may promote overall cardiovascular health. - Reduces Lower Back Pain
By strengthening and stretching the muscles in your lower back, glutes, and thighs, Bridge Pose can help alleviate chronic lower back pain and discomfort.
Things to Watch Out For
While Bridge Pose is generally considered safe, it’s essential to be mindful of a few things to avoid injury or strain:
- Neck and Lower Back Strain
If you experience pain in your neck or lower back during this pose, you might be over-extending or misaligning your spine. Try to keep your neck in a neutral position and avoid over-lifting your hips. - Knee Misalignment
If your knees are pointing outward or inward, it could strain your hips or knees. Make sure your knees stay in line with your hips and ankles throughout the pose. - Shoulder Tension
If you find that your shoulders are tense or lifted towards your ears, you might be straining your neck and upper back. Keep your shoulders relaxed and your arms grounded. - If You Have Certain Injuries
If you have neck, back, or knee injuries, you should avoid or modify this pose. Consult a doctor or physical therapist for tailored advice. Pregnant women in their second or third trimester should also avoid deep backbends.
Who Should Avoid the Bridge Pose?
While most people can benefit from Bridge Pose, some should take extra precautions or avoid it entirely:
- Pregnant Women (especially in the later stages): The backbend may strain the lower back and belly.
- People with Neck or Spine Issues: If you have herniated discs, sciatica, or chronic neck pain, consult with a healthcare provider before attempting the pose.
- Knee Problems: Those with knee injuries or discomfort may need to modify the pose by placing a block under their pelvis for support.
Modifications and Variations
If you’re new to yoga or the pose feels challenging, there are ways to make it more accessible:
- Block Under the Hips: Placing a yoga block under your pelvis can provide extra support if you’re unable to lift your hips all the way up.
- Use a Blanket: To support your neck, you can roll a blanket under your head if you find the floor uncomfortable.
- Lower Lift: Instead of lifting your hips high, try a lower lift, which still engages your glutes and core but may feel more comfortable for beginners.
Real People, Real Opinions
Here’s what a few people from different walks of life have to say about Bridge Pose:
- Jessica (34, USA): “Bridge Pose is my go-to when I need to relieve tension in my back. I sit at a desk for hours every day, and this pose helps stretch out all the tightness. It’s also a great way to wake up my body in the morning.”
- Miguel (45, Mexico): “I didn’t realize how tight my hips were until I started doing Bridge Pose regularly. It really helps with flexibility, and now I can do it without any discomfort. I love how it works my glutes, too.”
- Anika (67, Germany): “I’ve been practicing yoga for years, and Bridge Pose is one of my favorites. It’s easy to do, but it still gives me a deep stretch and makes me feel strong. It’s especially helpful for my lower back.”
- Kofi (29, Ghana): “I don’t practice yoga regularly, but I tried Bridge Pose after a friend recommended it for my back pain. I’m surprised at how effective it is. It gave me immediate relief!”
- Li (50, China): “For me, Bridge Pose is a great counter to all the sitting I do for my job. It’s helped with my posture, and I feel more open in my chest after doing it. Plus, it’s a nice gentle stretch after a long day.”
Final Thoughts
Bridge Pose is an accessible, effective, and versatile yoga pose that can benefit anyone, whether you’re an athlete, desk worker, or retiree. The key to mastering it lies in alignment, engagement, and consistency. Like any yoga pose, don’t rush it — progress will come with practice.
If you feel any discomfort or pain, listen to your body, adjust your form, or consult a healthcare professional to avoid any injuries. And, as always, remember: yoga is about the journey, not the destination.
So, give it a try and see how this simple, powerful pose can work wonders for your body and mind. Happy bridging!


